Showing posts with label Halloween. Show all posts

Monday, February 16, 2015

Orange equals Halloween

I know I'm terribly off season, but that's how it goes.  The Fusion Challenge this week has a beautiful photo with orange, teal, and brown and they have a super cute sketch to boot!  I took the orange and brown and found a big ole happy jack-o-lantern to make a sweet little Halloween card.  That's two Fusion Challenges in row that led me to Halloween.  At this rate my Halloween cards (I only need a few) will be done before Easter!

Here is the inspiration:


And here's the result:


Thanks for taking a moment out of your day.
Amanda

Supplies:
Stamps: Stamps By Judith (Jack), PTI (Trick or Treat)
Paper: PTI (White, Dark Chocolate, Ripe Avocado Patterns)
Other: Momento Ink, Copics, Tape from the Stash

Wednesday, February 4, 2015

The dark side

Today I am bringing you a very off season card.  Today I am sharing a Halloween card inspired by the challenge photo over at Fusion Card Challenge.


I know the photo is all about love and hearts and red and things.  But a forum friend gifted me a set full of cats and when I saw it the cats became the hearts which led to Halloween.


I used Psychedelic Embossing Powder to make the cats more magical.  I would love to use these cats with some black flock, but at the moment my flock supply is almost nonexistent thanks to the handy work of a little person who shall remain nameless.  The moon is simply silver vellum with added clouds.

Thank you for taking minute out of your day.
Amanda

Supplies:
Stamps: PTI (Superstition)
Dies: PTI (Limitless Layers 1 3/4" Circles), Memory Box (Mini Clouds)
Paper: PTI (Enchanted Evening, Soft Stone), Stash (Vellum)
Others: Colorbox (Black ink), Judikins (Embossing Powder), Ranger (Pumice Stone Distress Ink)


Sunday, September 8, 2013

Halloween treats with Cheesecloth!

This week Papertrey's Make It Monday challenge was to use a fabric stabilizer to help you make fabric die cuts.  Well, who would want to do that?  Being the planner that I am, I wanted to do something for the coming holiday, but what?  If only I had cheesecloth.  Someone gave me a ghost die cut a couple years ago for Christmas and I can't say it had ever been used.  Sometime I forget some of the stuff I have, especially when I receive it off season and then don't use it right away.  Anyway, I happen to remember that I do have cheesecloth sitting in a jar, left over from a project one of my littles did a couple years ago.  Now, where was the stabilizer?  Surely I have some, but where did I put THAT?  I head to the closet where most of the sewing stuff is and it turns out that at some point I bought heat-n-bond.  Why?  I don't know.  I didn't find the stuff I thought I was going to, but I can use this.  Finally, I can try and get this project started...

So I get these oh so adorable cheesecloth ghosts die cut.  Now what?  Well, Halloween treats are always a hit around here.  I already have so many things planned what else can I do?  Aha!  I have glassine bags I bought years ago and then didn't know what to do with.  So let's make this work.  And it did! 

Here is the final product.


So much fun!  Now I just have to make a few more so everyone around here gets one.  And with all that stuff I forgot I had - heat-n-bond, cheesecloth, dies - I am putting this up in the Forgotten Things Challenge at Our Creative Corner.  I'm also putting in over at the Anything but a Card Challenge over at Gingerloft Challenges.

Thanks for looking!

Supplies
Dies from Sizzix
Cardstock from PTI
Ink from Ranger
Glassine bag, cheesecloth, Heat-n-Bond

Sunday, August 25, 2013

Tea Stained Treats

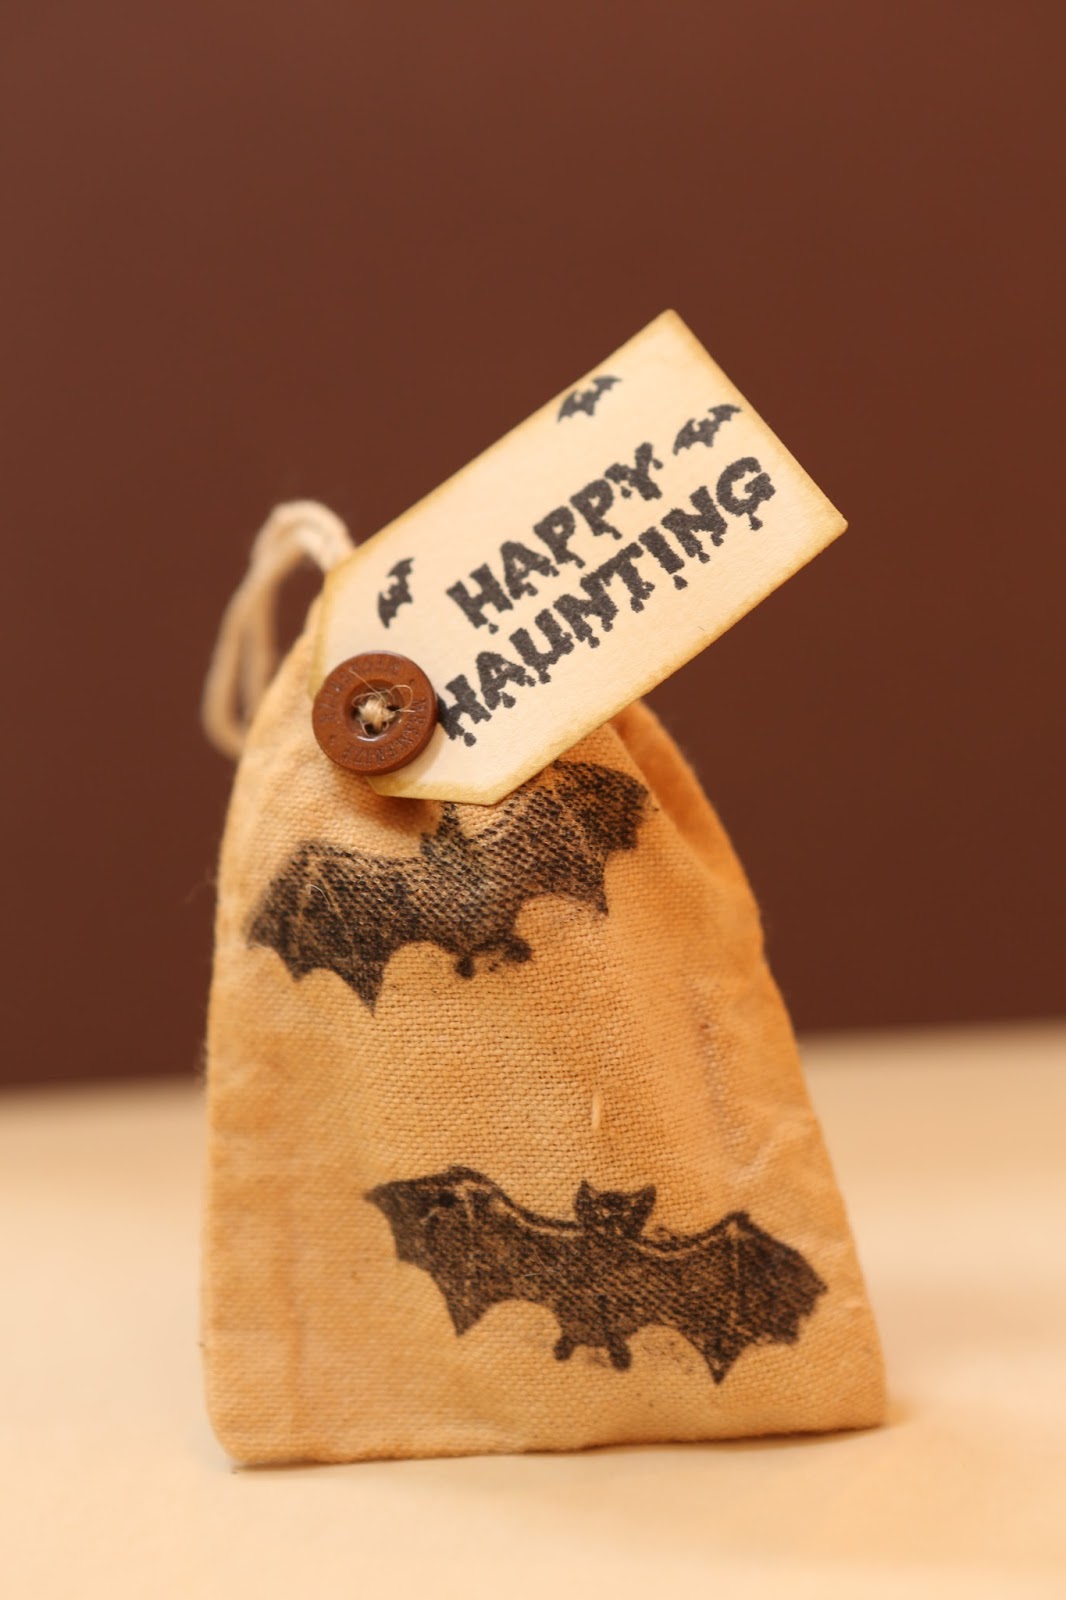
One of the challenges at Stamp-A-Faire was tea staining.  There were a few techniques they demonstrated one of which involved Kool-Aid which had amazing results.  Unfortunately I didn't have any Kool-Aid in the house so I'll have to try that one at a later date.  I did, however, have tea.  One of the tea techniques involved dying muslin.  I had picked up these cute little muslin goody bags for this treatment and went right to work.  I made really strong tea apparently because I was able to get a good stain in very little time. 


These little Halloween bags will be filled with some fun, festive goody in the coming weeks. 

Let me know what you think.

Supplies
Watercolor Paper from Michaels
Buttons from PTI
Bags from Stash
Stamps from Stampers Anonymous, Stamps by Judith, Inkado, Northwoods Rubber Stamps, Stampin' Up, and unknown
Ink from Ranger and Momento
Die from PTI
Twine from PTI

Mixing Mists

I love mists, though I don't really like the mess.  It's not even the mess really, it's the idea of having a mess I must walk away from when the littles decide to make one of their own.  And trust me, my littles can make one in two seconds flat.  This was a fun challenge if for no other reason than I got to make a mess without worrying about the littles. 

Now for this technique I only had the older version of reinkers, which is not what the design team was using.  It did take a lot of ink and I never really got the color I was trying to make, but I did make a perfect match to Melon Berry.  Easy peasy!  I just revamped the colors for the card to make it work. 


Yes, another Halloween card.  We are big Halloween people.  I mean BIG.  Halloween is a month long celebration leading up to the Great Pumpkin's visit in this house.  I see now most of the detail was lost in my poor lighting situation this afternoon.  The image was stamped and embossed with black embossing powder that has rainbow glitter mixed in.  It was then colored with Copics and the stars were colored with Stardust pens to add a little sparkle. 

Thanks for looking.

Supplies
Cardstock from PTI
Stamps from PTI
Ink from Clearsnap and PTI
Dies from PTI
Embossing Powder from PSX (yes, I've had it that long!)
Copics
Stardust pens

Sprinkle of Salt

Nichole over at Papertrey always makes water techniques she does look so easy and yet, I always have trouble getting them to work for me.  I had more success this time with the salt technique, but it took several tries and a lot of frustration.  Even still, I'm not sure I did a great job.  Of the ones I did here are the two best of the effect. 


I like the way the watercolors came out.  I'm just not sure the salt effect is noticeable. 

Let me know what you think.

Supplies
Cardstock from PTI
Stamps from PTI and Michaels (Inkado, I think)
Ink from Ranger
Die from PTI
Divine Twine

Gallon, Quart, Pint

Next up, is something of a color challenge.  It goes to the theory about how much of each color to use.  I'd love to tell you all about it, but frankly, I'm too tired so you can read all about it over at the Papertrey blog.  I have put together a sweet little Halloween card.


Hopefully it's clear that Purple is the gallon, Black is the quart, and Orange is the pint.  I went back and added little swipes of pewter Stain because I felt it needed a little something.

Supplies
Cardstock from PTI
Stamps from Michaels (Inkado I think)
Ink from Clearsnap
Embossing Powder from Stampendous
Stain from Ranger

Scent-sational Cards

The next challenge I'm putting out here is the Scent-sational Cards Challenge, which is making your own scratch and sniff cards.  I must admit I did not go into this challenge prepared.  I did not have any of the sweet smelling Kool-Aid on hand.  The design team pointed out that spices could be used and so I went to fall.  In case you can't tell, I am ready for fall.  I love fall.  I made a tag that will be attached to some kind of treat for one of the littles in the coming months.  Of course, that means I need to make more tags so everyone gets one.  But for today I have just the one.


It seems to me a solid image works better with this technique but as I don't tend to get those I made it work with something else.  I pulled out the Fall Fillers for the Friendship Jars and colored it in.  Then I mixed up a scenty embossing powder with cinnamon and nutmeg and applied it by painting the pumpkins with embossing ink from the refill bottle to apply the embossing powder, and thus the scent. 

Let me know what you think.

Supplies
Cardstock from PTI
Tag from Stash
Stamps from PTI
Dies from Sizzix and PTI
Ink from Ranger and Momento
Embossing Folder from Sizzix
Copics

Sweet Sugar Coated Embellishments

Here we are at the start of the series of blog posts showing all that I got done yesterday during Papertrey's Stamp-A-Faire Event.  I will likely be posting in the opposite order of how there were presented at Papertrey yesterday just because it's easier for me.  First up is the sugar coated embellishments challenge, and it seems as though I would love this one given this is the Sugar Coated Bits Blog, though the name has nothing to do with glitter. 

I do, however, love glitter and truth be known, so does the hubby.  So I went with Dawn's approach using Glossy Accents and getting the "bump" from it to help the design along a bit. 


Here I used the technique to beef up the candle on this Halloween card. 


Here is a slightly different angle.  I die cut the candles from Fine Linen Cardstock, aged them a little with distress ink, and then added the glitter (a color called Flesh).  I love the dimension the glitter gives the candle. 

I will also be entering this in the Just Add Glitter Challenge over at Whimsical Designs.

Thanks for looking.  Let me know what you think.

Supplies
Cardstock from Papertrey
Dies from Sizzix
Ink from Ranger
Tissue Tape from Idea-ology
Glossy Accents from Ranger
Glitter from Sparkle N Spinkle
Stain from Ranger

August 2013 Papertrey Blog Hop

After a very full day of challenges and projects yesterday, today is Papertrey Ink's monthly blog hop.  This month provided a series of color and sketch combinations.  Pick one and interpret.  While several of the color combos and inspiration photos caught my attention, nothing screams at me more than chocolate chip cookies.

PTI-fast-food-6

My inspiration came from the colors, my desire to work on Halloween projects, and treats.  Here's my interpretation.  The skull is cut from Fine Linen Cardstock, aged with white paint and distress inks.  It's been attached to Dark Chocolate Cardstock with distressed edges.  A strip of True Black Cardstock was cut and then tissue tape was applied.  It was wrapped with twine and a few tiny bat brads were added.  The whole thing was attached to a Kraft Cardstock Card Base which had also been aged with distress ink. 


I am also entering this in A.R.T. Card Challenges Anything Goes Challenge.  I'd love to hear your thoughts.

Supplies
Cardstock from Papertrey
Die from Sizzix
Tissue Tape from Idea-ology
Twine from The Twinery
Ink from Ranger
Paint from Ranger
Brads from Stash

Tuesday, August 13, 2013

Monster Mash!

This week Simon Says Stamps has a triangle challenge going on.  Well, while I understand triangles are pretty "in" right now, they just aren't my thing.  For me triangles are math and I'm afraid they always will be so I had to put the thinking cap on.  I was determined to find a way to use triangles.  Lucky for me Halloween is right around the corner and on my mind.  Who wouldn't love a little purple monster with triangle teeth?  And he had to have a horn...So me my monster...


No stamping here, which may be a first for me.  The entire face is covered in purple Fun Flock!  So much fun!!

Tell me what you think about this little monster.

Supplies
Cardstock from PTI
Buttons from PTI
Embossing Folder from Sizzix
Fun Flock from Stampendous
Ink from Ranger


Monday, July 8, 2013

Sketch inpired Halloween

We love Halloween in this house!  LOVE it!!  So when I saw the sketch challenge over at JUGS this week I immediately saw a spider web in the corner.  Here's the sketch that brought Halloween out even earlier than usual.  I was especially happy to be able to use the stamps my children picked out for me as gifts because, honestly, they were so off season I had forgotten about them.


You can't have a spider web without spiders.  It all fit together as it should. 

I hope you enjoy a little fall in the midst of the heat.

Supplies:  Cardstock from PTI, Stamps from Michaels (I don't remember the brand as my children gave them to me for my birthday), and Stampin' Up, Ink from Ranger, Embossing Powder from Stampendous